The WordPress REST API provides us with a way to communicate with our WordPress sites using JSON. To some people, this might not mean much, but to every web and application developer, this is kind of huge. We can use WordPress to easily set up a CMS while taking complete control of the front end using the REST API.
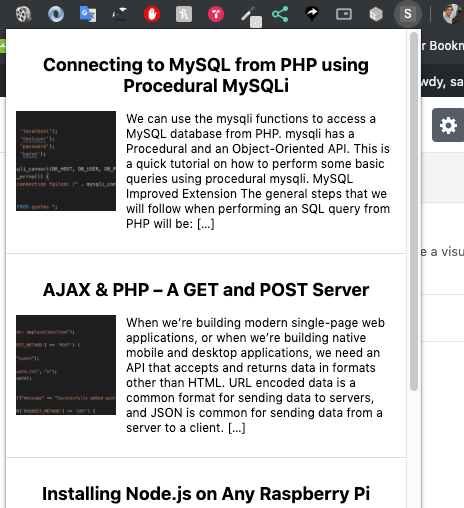
In this tutorial, we will just take a small peak at the WordPress REST API by creating a chrome extension that shows recent posts. We will get the 5 most recent posts from a site and display them in a small extension like this:
If you have your own WordPress site setup, then use posts from that site, otherwise, you can use sammeechward.com. If you are using your own site, just replace sammeechward.com with your own URL in the code examples.
Note:
This tutorial assumes you are already familiar with WordPress, basic front end web dev, and using RESTful APIs.
Rest API
As I already mentioned, the WordPress REST API provides us with a way to communicate with our WordPress sites using JSON. Take this site for example. You can view all of my posts by going to https://sammeechward.com/posts/ or you can view all of my posts as JSON by going to https://sammeechward.com/wp-json/wp/v2/posts. Or if you just wanted to view this post, you could go to https://sammeechward.com/wp-json/wp/v2/posts/371.
For this tutorial, we want to get the first 5 posts, so we’ll be using the following URL: https://sammeechward.com/wp-json/wp/v2/posts?per\_page=5. This will give us a list of objects that contain all of the data about the post. By default, these queries don’t contain all of the data we need. Things like image URLs are left out of the results. If we add the parameter _embed=true, then we’ll get everything we need
https://sammeechward.com/wp-json/wp/v2/posts?per_page=5&_embed=true
This is the basic gist of the REST API. There is way more to it than this, but that’s all I’m going to cover here. For more information, check out the following resources:
- REST API Handbook at wordpress.org
- WordPress: REST API at lynda.com
Setup The Chrome Extension
Now that we know how we’re getting the data, it’s time to set up the chrome extension. We will just go over the basics here and set up a very simple extension. For more information on creating chrome extensions, visit Chrome’s Getting Started Tutorial.
Create a new directory for the extension named sams_posts. (or whatever your site’s name is)
All extensions need a manifest.json file that contains all of the details to run the extension.
Create a manifest.json file inside the sams_posts directory and paste the following code inside of it:
{
  "name": "Sam's Posts",
  "version": "1.0",
  "description": "The most recent posts from Sam's site",
  "browser_action": {
    "default_popup": "popup.html"
  },
  "manifest_version": 2
}
Most of that should be self-explanatory, but what’s up with the popup.html? Well that’s where we’ll put the html that will be rendered when we click on the extension button in chrome.
Create a popup.html, popup.css and a popup.js file. Paste the following code into the popup.html file:
<!DOCTYPE html>
<html lang="en">
<head>
  <meta charset="UTF-8">
  <link rel="stylesheet" href="popup.css">
</head>
<body>

  <h1>Hello Popup</h1>

  <script src="popup.js"></script>
</body>
</html>
This is our boilerplate HTML code with a little message to show up when we view our extension. Ok, let’s add this thing to chrome.
Open the Extension Management page by navigating to chrome://extensions.
Enable Developer Mode by clicking the toggle switch next to Developer mode.
Click the LOAD UNPACKED button and select the sams_posts directory.
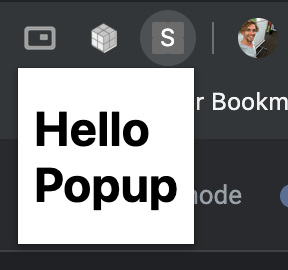
At this point, you should a little S icon appear with the other installed extensions in chrome. Click this icon and you should see the Hello Popup message.
Now that we’ve got an extension, let’s pull in data from our API.
Fetching The JSON
I’m going to use jQuery for this example because anyone can understand how to use jQuery. But really, you can use any library, framework, or lack of library and framework.
Download jQuery from https://code.jquery.com/jquery-3.4.1.min.js and include it in your project. Make sure you include it in your popup.html.
Add the following code to you popup.js file:
$( async () => {
  const results = await $.get("https://sammeechward.com/wp-json/wp/v2/posts?per_page=5&_embed=true")
  console.log(results)
});
This should grab the 5 most recent posts from the API and log them to the console. If you save this file and click on the extension icon again, you should still see the Hello Popup message, but how do we see the results that we log to the console?
Right click on the extension icon and select Inspect Popup.
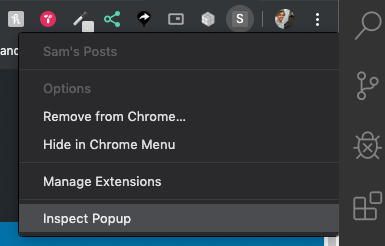
This will open the chrome developer tools for the popup. Open the console tab. If you’re using your own site, then you’ll probably see an error message stating the request has been blocked by CORS policy: ‘Access-Control-Allow-Origin’.
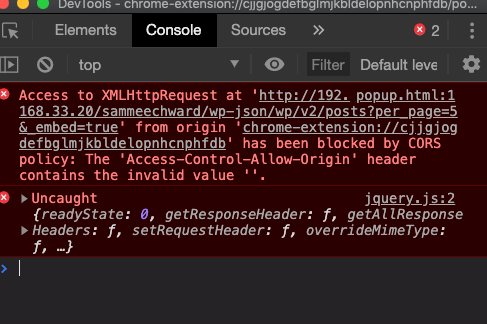
I’m not going to go into a huge amount of detail about what CORS is here, but here’s a quick sentence about it. A website from one server can’t make a request to a different server without special permission. So we need our WordPress site to give special permission to chrome extensions that allow them to GET data.
There are a few ways of doing this, but the code block below will solve this problem for us:
function chrome_extension_cors_rest_send_cors_headers() {
  function is_chrome_extension() {
    $chrome = "chrome-extension://";
    $origin = get_http_origin();
    return substr($origin, 0, strlen($chrome)) === $chrome;
  }

  function chrome_extension_cors_allow_access( $filter ) {
    header( 'Access-Control-Allow-Origin: *');
        header( 'Access-Control-Allow-Methods: OPTIONS, GET' );
    return $filter;
  }

  if (is_chrome_extension()) {
    add_filter( 'rest_pre_serve_request', 'chrome_extension_cors_allow_access' );
  }
}
add_action( 'rest_api_init', 'chrome_extension_cors_rest_send_cors_headers');
You could copy and paste this into your theme’s functions.php file, or put it into an existing theme, but let’s put it in its own plugin.
chrome-extension-cors Plugin
Create a new file called chrome-extension-cors.php inside you plugins directory and add the following code to it:
<?php
/**
* Plugin Name:       Chrome Extension CORS
* Description:       Enable GET requests for any chrome extensions using the REST API
* Version:           1.0.0
* Requires at least: 5.2
* Requires PHP:      7.2
* Author:            me
* Text Domain:       chrome_extension_cors
* License:           GPL v2 or later
* License URI:       http://www.gnu.org/licenses/gpl-2.0.txt
*/

function chrome_extension_cors_rest_send_cors_headers() {
  function is_chrome_extension() {
    $chrome = "chrome-extension://";
    $origin = get_http_origin();
    return substr($origin, 0, strlen($chrome)) === $chrome;
  }

  function allow_access( $filter ) {
    header( 'Access-Control-Allow-Origin: *');
        header( 'Access-Control-Allow-Methods: OPTIONS, GET' );
    return $filter;
  }

  if (is_chrome_extension()) {
    add_filter( 'rest_pre_serve_request', 'allow_access' );
  }
}
add_action( 'rest_api_init', 'chrome_extension_cors_rest_send_cors_headers');
In the admin panel, activate the new plugin.
As long as this plugin is activated, chrome extensions will be able to make GET requests to your WordPress site.
Back to the JS
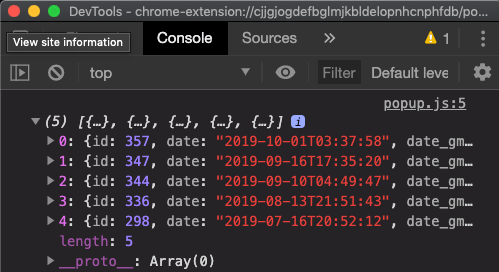
Now that we don’t have CORS issues anymore, let’s take another look at the extension’s console. We should now be able to see 5 JSON posts show up. So now we just want to take those objects and turn them into HTML elements.
Add the following code to your popup.js file:
const posts = results.map(post => $(`
  <a href="${post.link}" class="post">
    <h2 class="post__title">${post.title.rendered}</h2>
    <img class="post__image" src="${post._embedded['wp:featuredmedia'][0].media_details.sizes.thumbnail.source_url}">
    <p class="post__excerpt">${post.excerpt.rendered}</p>
  </a>
`))

$(document.body).append(posts)
This code will create a new post element for each post returned from the API. It will then append them to the body of the popup.html file.
Open the popup again and you should see the 5 posts show up. Of course, they don’t look great, so we should add some CSS. Feel free to use my CSS or create your own styles.
body {
  width: 400px;
  margin: 0;
}
.post::after {
  content: "";
  display: block;
  clear: left;
}
.post {
  display: block;
  border-bottom: 1px solid #DBDBDB;
  color: black;
  text-decoration: none;
  padding: 10px;
}
.post:last-child {
  border-bottom: none;
}
.post:hover {
  background-color: #DBDBDB;
}

.post__title {
  width: 100%;
  text-align: center;
}
.post__image {
  float: left;
  margin-right: 10px;
  margin-bottom: 10px;
  max-width: 100px;
}
Now your posts should look something like this:
Take a moment to look through the JSON objects and see what other pieces of information you could display in the extension.
Linking out of the Extension
Each of the posts is wrapped in an anchor tag that should link to the original post on the WordPress site. Notice that clicking on a post in the extension doesn’t do anything. That’s because chrome extensions need to do things differently sometimes, and opening new tabs are one of those times.
Add the following line of code to the popup.js file:
$('.post').on('click', function(event) {
  const url = $(this).attr('href');
  chrome.tabs.create({ url });
})
This will listen for a click event on any posts, grab the URL from the anchor tag, and tell chrome to open a new tab with that URL.
Summary
In this tutorial, we took a look at how we can use the WordPress REST API to display our post content in a different application. For this example, we used a chrome extension, but this could be any type of web, mobile, or desktop application. You could even make an alexa app to read you the newest post every morning, it’s really up to you.
This was just an introductory look at using the REST API and I encourage you to learn more by checking out the REST API Handbook at wordpress.org